Pages

Tuesday, November 19, 2013

STOP and learn to read!

There are some first things that a child learns to "read". One of those things is often a stop sign:


A lot of people will argue, he's not really "reading" the stop sign. He's not actually decoding the print. He could not "read" the word in a different font, in a different location, if it was not on a red, octagon shaped sign. That is probably true, but that does not mean he is not reading it.

Reading is seeing print and getting meaning from it. Although a young child reading a stop sign is not "real" reading, it is certainly the beginning of real reading, and it is something that you can use to teach reading.

You can teach a lot of reading with just the stop sign. Using only a stop sign you can teach the following skills:
  • letter versus word (early reading skills)
  • capital versus lower case letters (alphabet)
  • letter identification (alphabet)
  • letter/sound connection (phonics)
  • letter formation (writing)
  • first letter and last letter (early reading skills)
  • counting (math)
  • reading left to right (early reading skills)
Click here to download the STOP and Learn to Read printable pack FREE! (For best results print on card stock and laminate.)

Here's how you teach your child to read using a stop sign:

First, start pointing out stop signs when you see them and say things like:
  • Look, there is a stop sign!
  • Do you see the stop sign?
  • That sign says STOP.
  • Do you know what that sign says?
Next, wait for your child to start pointing out the stop sign. Now you are ready to start to focus your child's attention on the details of the stop sign. When he says, "I see a stop sign!, you say something like:
  • You're right, that sign says STOP.
  • What color is the stop sign?
  • Do you see the letters on the stop sign?
  • The stop sing is an octagon shape, it has 8 sides.
Now you are ready to dig in deeper. This involves more than just a drive by. You can take a walk and stop and look at a stop sign up close. You can use copies of stop signs at home to take a closer look.

To teach letter versus word point to the word STOP and say:
  • This is the word STOP.
  • There are four letters in the word STOP: S, T, O, P (point out each letter)
To teach first letter, next letter, and last letter point to the letters and say:
  • S is the first letter in the word STOP.
  • P is the last letter in the word STOP.
Print and cut this puzzle to practice saying the letters, building the word, counting the letters and working left to right.
Reading left to right can be shown to them by sliding your finger under the word STOP as you say the word slowly. Read the names of the letters, pointing to them as you say them S-T-O-P. After lots of modeling ask your child to read the word using their finger and to point and say the letters. If they have trouble matching one-to-one then hold their finger and guide them. As you are pointing to each letter and saying the name you are working on letter identification.

Get out letter tiles or magnetic letters and have them build the word stop. Make sure they always start with the letter S and build the word from left to right to reinforce the left to right movement in reading and writing.

This page can be used to trace the letters to practice letter formation, and then build the word with letter tiles or magnetic letters:

You can practice writing the word stop to practice letter formation. Follow the directions for letter formation explained in The Name Game.

Counting:
  • Count the letters in the word STOP. (You are also reinforcing letter versus word.)
  • Count the sides of the sign.
Capital and lower case letters:
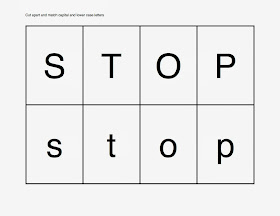
Print out the capital and lower case letter cards to use for letter identification, matching capital to lower case, and building the word stop. 

Show them that the word on the stop sign is written in all capital letters. Show them what it looks like with lower case letters.
We got out the letter tiles (Bananagrams) and matched them up to the letter cards.
We made the word STOP with different letters.
More letters to make the word STOP.

How many different kinds of letters can you use to make the word STOP?


Finally, the last page included in the STOP and learn to read printables is the size sequencing with numbers. 


I had a plan to arrange the signs and the numbers on the pocket chart like this:


As often happens, my daughter had another idea about how to use the numbers 1-3. She quickly got another set of number cards from the pocket chart and matched them up:


Letter tiles, STOP and learn to read printables, Traffic sign printables. We made a mess, we had fun, we learned!

Continue with the fun with these great related FREE printables:
Memorizing the Moments: Traffic Signs Printables
Click here to go to the free printables and blog post Traffic Sign Tot Pack from Memorizing the Moments

Enchanted Homeschooling: Truck Storybook Fun!

Click here to go to the Truck Storybook Fun blog post and free printables. at Enchanted Homeschooling Mom.

123 Homeschool 4 Me: Traffic Signs Preschool Pack
Click here to go to the free printables and blog post Traffic Signs Free Preschool Pack at 123 Homeschool 4 Me.

Makinglearningfun.com Street Sign Memory Fun
MakingLearningFun.com has Street Sign Memory Fun

Monday, September 23, 2013

The Science Chef Makes Popcorn Balls

He's a scientist. He's a chef. He loves to do science experiments and he loves to cook. I decided that I should get him a book that connects science and cooking, so we got a copy of The Science Chef. The first experiment he chose to do was to make popcorn balls.


He says:

I have one major problem with this book. It always says to use margarine instead of"butter" or "margarine or butter". One of the most annoying recipes was for strawberry butter. It said here is a recipe for strawberry butter that doesn't even use butter. It uses margarine! In another place it says, they substitute applesauce for margarine and oil,, but then they use margarine! That is just plain idiotic.

The first recipe I chose to make was popcorn balls. I chose this because I like popcorn balls. You need to use an edible adhesive.

The science behind popcorn popping is this: Popcorn kernels pop, after they've been dried, because of a small droplet of water inside the kernel. It turns into steam and it cracks the hard outer shell with explosive force resulting in fluffy popcorn. This also explains the dud kernels. No matter how much you heat them they just won't pop. This isn't a problem with your popping strategy, but simply that the water droplet has evaporated, and/or because the outer shell has already cracked. You can show this by hitting an un-popped kernel hard with a hammer to crack the shell. Then, if you try to pop that, it won't pop.

The first thing I did was pop 10 cups of popcorn.


Then what I needed to do was melt a half cup of butter (or "margarine")in a pan over medium heat. Once the butter was melted I added 11.5 ounces of marshmallows and turned the heat to low.

Ingredients: popcorn, butter, honey, marshmallows (little sister "helper" optional)
When the marshmallows were melted I added 1/4 cup of honey and waited for it to melt in. After that happened I took it off the heat and let it cool for five minutes. Then I poured this on the popcorn and tossed the popcorn to get it well coated. Next I moistened my hands with water and started forming the balls which I put on a cookie sheet covered with wax paper. Finally, I let them cool in the refrigerator for one hour.

rolling the popcorn balls
The marshmallows were stale the first time and so they didn't melt properly. They ended up turning into a big pile of silly-putty-like goo. So, I threw that away and waited a couple of hours for my mom to take my baby sister (She insists she is not a baby) to soccer practice and on the way home she would pick up some marshmallows (non-stale ones). When she got home I  continued with the recipe and made some popcorn balls. I rolled them up, let them cool, and put them in a bag.

I learned that I should not give any popcorn balls to my baby sister because she only ate half of it and the other half got thrown away. The next day, I told my mom not to let her have one, but she gave it to her any way. There was another one thrown into the trash!


Sunday, September 15, 2013

Origami

 Today I have a guest post from my 11 year old son. He is homeschooled and in the 7th grade. He has been working on origami for fun (and I'm counting it as art).


Origami is the art of Japanese paper folding. Recently, I’ve been doing a lot of origami. I’ve created birds, mushrooms, dragon, cicadas, tables, and many more things. I learned a lot of these from the website origami-instructions.com. The rest of it I came up with myself.

Butterfly
There are many names for different kinds of folds. A few are the: accordion fold; petal fold; and inverse-reverse fold. These basic folds help you read instructions so that it can just say, “do a petal fold”, instead of saying, “fold side AB to center. Repeat on other side. Fold point E downwards. Crease well. Unfold. Carefully pull point F upwards. Crease extra flaps to center.” Much simpler, right?

Bird Base
There are also many “bases”. These are common positions in origami, given names. These include: The fish base; the boat base; the frog base; and the bird base. It makes it much simpler, so instead of showing all of the folds it can just say, “Start with an origami bird base.”

This is a dragon. It was my hardest fold, and my first attempt at it, so it did not come out perfect, but it still came out okay.


I fold a lot of origami for people including: my sister; kids at Sunday school; and people at the doctor’s office. The kids at Sunday school even want me to give them a lesson! I left birds perched on the doctor’s office counter. Here is me with my perching bird: 

                                           
Origami is a very fun activity to do and learn.

Friday, March 29, 2013

Real Science 4 Kids Chemistry

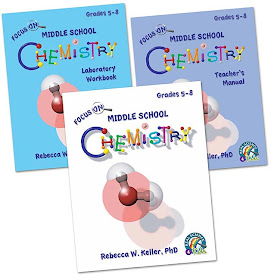
This year I decided to try the Real Science 4 Kids curriculum. There are not a lot of secular science curriculums aimed at homeschoolers, and I had heard good reviews on this one. My sons are now in grades 6 and 7 so I figured the Middle School, grades 5-8, version would be perfect for us.  We decided to start with Chemistry.
 I am lucky that our charter school purchases our curriculum and educational supplies, so I don't have to worry as much about cost. I decided to go ahead and also order the hands on kit (which has supplies for all three topics: Chemistry, Biology, and Physics). We got the Level 1 kit from Home Science Tools


Level 1 Kit for Real Science 4 Kids

We just finished with the Chemistry unit and so far it this curriculum working for us. The text is very simple, but goes into good detail at the same time. The hands on experiment with every chapter is great. The textbook, laboratory workbook, and teacher's manual are all nicely laid out and easy to follow.

Here's a little summary of our experience.

Chapter 1: Matter

This chapter introduces atoms and the periodic table. I supplemented here with Teacher Book Bag's Periodic Table of Elements Card Kit.  Printed, laminated, and cut out the kids could handle all of the elements of the periodic table, sort them into types, match symbols with names, and even re-create the periodic table on the pocket chart (at least a good chunk of it before running out of room!)


Another supplement were the free downloads from Sunflower Schoolhouse 


There is a big selection of interactive on-line periodic tables for the kids to explore as well:

Chapter 2: Molecules

This chapter was lots of fun because we got to make molecules out of marshmallows!


Start with some carbon, oxygen, and nitrogen.

Building molecules

Even little sister joined in the fun!


Chapter 3: Chemical Reactions

Who doesn't love a good chemical reaction experiment? Several different chemical reactions are discussed: combination reaction, decomposition reaction, displacement reaction, exchange reaction, and spontaneous.

Chapter 4: Acids, Bases, and pH

The experiment for this chapter was to make an acid-base indicator. The kids really had fun with this one, cutting up and boiling the cabbage and making the pH paper.
Making the pH paper with the purple cabbage water

testing acids and bases with the homemade pH strips 

 Chapter 5: Acid-Base Neutralization

In this experiment we got to use our cabbage water again to plot an acid-base titration. It was exciting to watch the solution turn from an acid into a base.


Chapter 6: Mixtures

We learned about two types of mixtures: heterogeneous and homogeneous. In the experiment we got to see first hand how soap helps dissolve oil in water.

Chapter 7: Separating Mixtures

This was one of my favorite experiments; using paper chromatography to separate individual colors in various inks.


Chapter 8: Energy Molecules

The kids read about a lot of the same things I recently learned in a college level nutrition class about nutrients, carbohydrates, monosaccharides, disaccharides, polysaccharides, starch, cellulose, amylose and amylopectin.

For the experiment we used tincture of iodine (in the kit we purchased) to test a variety of foods for starch content.

I created vocabulary flash cards for Chapters 8, 9, & 10. I printed them on card stock (they are already formatted to print on business cards, Avery 5371, if you don't want to have to cut them up yourself). I would put the words in the kids' workboxes with the definitions in the pocket chart and they would go match the words with the definition (or the other way around). Together we would check the pocket chart to see if they got them correct. Click here to link to a free pdf file of the vocabulary cards: Chemistry Vocabulary


page 1 of the vocabulary cards


Chapter 9: Polymers

After reading about polymers the experiment was to observe a change in properties as two polymers are added together. The kids were very excited to discover the fun, gooey glue that you get when you mix together white glue and laundry starch!

Little sister had lots of fun playing with the goo after the experiment was over!


Chapter 10: Biological Polymers: Proteins and DNA

The final chapter is on DNA and in addition to the experiment in the text, we are going to extend the unit for a couple of weeks with some supplemental hands-on kits:


A DNA model from the Science Wiz kit.
Have you used Real Science 4 Kids? What did you think of the curriculum?